Believe it or not, we have not always been into cooking our own meals. We did have very rudimentary knowledge of cooking early on and applied some of that knowledge to cooking on occasion, but often we were cooking Hamburger Helper and freeze-dried mashed potatoes other sort of pre-made meals. We don't necessarily look down on these methods for getting food on the table, but we do look back while we're making a roast or braising short ribs and say "remember when we'd make Tuna Helper???" and laugh a little.
Our learning curve was an extreme one, and it was certainly accelerated with some help from the Food Network. In particular, we'd watch Rachael Ray's 30-minute meals. Yes, she's blown up today with her shows and magazines and there are entire sites out there that bash her and she's too perky and her cooking is too elementary, etc., etc... but back then she was making advanced meals for us at the time! And we thought: we can do that! We'll always have a little place in our cooking hearts for Ms. Ray - even if today WE even find her cooking a little elementary!
So here's our dedication to her - this is 100% our own recipe, but it certainly seems like it could be one of her 30-Minutes Meals. Hey Rachael - you can use this recipe! Just drop us a line first!
30:00 - gather: two boneless/skinless chicken breasts; a few deli ham slices; a few fresh sage leaves; some bleu cheese (we bought a big block - i LOVE bleu cheese); saran wrap; a big, metal, heavy-bottomed pan for smashing; and put a skillet on the stove on medium heat.
28:00 - butterfly the chicken breasts by putting them flat with the "meatier" side to your right (if yer a righty) and slicing - one knife-slice at a time - back through the middle from the right to left, slicing sideways almost to the end but not through (does that make sense?).
26:00 - lay your butterflied chicken breast down on a layer of saran wrap and cover with another layer of saran wrap. moisten both of these layers with saran wrap with a sprinkle of water to lube them up a little (thanks, Alton!). take your heavy-bottomed skillet (not the one on the stove top!) and flatten those breasts to about 1/3" thick... as flat as you can get them without ripping them apart.
24:00 - add some canola oil to the pan. take each flattened breast and at one end place a slice of ham, a sage leaf, and a cut or a few crumbles of the bleu cheese. then roll the chicken breast up around that "filling" until you've got a little, round chicken roll-up. secure with three toothpicks. maybe it's not a real "roulade" - but that sounded better than "chicken roll-up"! season the outside of the chicken rolls with kosher salt and fresh-ground pepper.
22:00 - add chicken roulades to pan and start browning on each side, 3-minutes per on 3 sides.
21:00 - while that is going on, get out your 10-minute brown rice and get one cup of water going to make your one cup of rice in. also, gather 1/2 a green pepper, 1/2 an onion, and a couple garlic cloves.
19:00 - turn chicken. dice up your pepper, onion, and garlic. add a last, smaller saute pan to some heat. put rice in boiling water and return to a boil and cover and simmer for 5 minutes (as it says on the package)... add some canola oil to the smaller skillet.
16:00 - add your pepper and onion to your smaller skillet to start them sauteing..
15:00 - turn chicken
14:00 - take sip of wine. stir veggies.
13:00 - check rice - if most of the water is evaporated, just turn off heat, give it a stir, and put the cover back on.
12:00 - last chicken turn. stir veggies and add in the garlic. season with salt and pepper.
10:00 - sip of wine. leaf through Penzey's catalog. smoked spanish paprika! mmmmm...
9:00 - keep stirring and sauteeing those veggies... should be done soon, so turn off the heat.
8:00 - chicken comes out, temporarily. should have some nice saute bits at the bottom of your pan, pour in some of that Cabernet you have - 1/2 cup? - and a big pat of butter! deglaze the pan and scrape off the bits at the bottom.
6:00 - add the chicken back in, turn down the heat, and cover.
4:00 - add your "dirty" to your rice - put the seasoned-n-sauteed pepper/onion/garlic mixture into the rice and stir it in. give a taste for seasoning and then just re-cover it. it will stay nice and warm and those flavors will be given time to impart into the rice.
3:00 - sip of wine. give the chicken a turn. hmmmm... Penzey's gift boxes would make a perfect gift for a Boston Chef!
1:00 - check the chicken, should be all set by now. turn off heat.
0:00 - scoop some "dirty" rice onto a plate. add one of the chicken roulades. sit down with your glass of wine and enjoy! the wine/butter-poaching adds great flavor to the ham/bleu/sage filling... and the rice has a nice dirty kick to it! Delicious!
That's all the time we have for today - and remember, a great meal is never more than 30 minutes away! Thanks, Rachael!
Wednesday, November 29, 2006
30-Minute Chicken Roulade and "Dirty" Rice
Monday, November 27, 2006
Beef and Vegetable Stew

We've never taken on beef stew, and we felt that it should be in our arsenal of recipes, so Stacey made it her mission yesterday to deliver.
I coated about 3lbs stew meat in a light coating of seasoned (salt and pepper) flour and seared them in canola oil in our Dutch Oven. I worked in about 4 batches so as not to crowd, and I also added more oil when needed.
After they were browned, they were set aside, and I deglzed the yummy brown bits with 1/2 cup cabernet and then removed the deglaze-juice for later use. Now time for the veggies! I cut up all the veggies in at least 1 inch cubes b/c I didn't want them to disintegrate while simmering for so long!
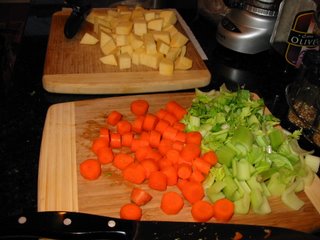
This time in the Dutch Oven, I used olive oil and threw in 1 onion, 4 ribs of celery and about 6 medium carrots, seasoning with S&P. After 6-7 minutes, I threw in about 12 baby bella mushrooms. A couple minutes more cooking time, then I removed those veggies and set them aside.
Next come the yellow turnips or rutabegas! These are a GREAT subsitution for potatoes to cut down on some of the carbs - and I swear when the dish is finished you can't tell the difference! Saute about 2 cups worth for about 10 minutes and then put the beef in with the turnips.
Let those get to simmerin' and add 4 cups low-sodium beef broth (I like to control the salt myself), a couple tablespoons of tomato paste for "structure" (as Emeril likes to say), the reserved wine and yummy brown bits, another 1/2cup cabernet and a couple splashes of red wine vinegar.
I let that come up to a boil, returned the veggies back to the pan with a bunch of fresh thyme sprigs, a couple bay leaves, and some final S&P seasoning. I covered the pot and set on simmer for 2.5 hours while we watched the Pats game (big win!!!). Towards the end, I noticed it wasn't as thick as I wanted so I dissolved a tbsp of flour in a little water and poured that it, bringing it back to a low boil and then simmering for the last 30 minutes with the cover off. Finally, at that point in the cooking process, I added a cup of thawed frozen peas and a cup of thawed lima beans.
The stew came out really tasty... very tender beef, all the different veggies, and wonderful, subtle flavor. This would definitely serve 6-8 people easily, and because of the volume we froze enough for the 2 of us for another night. Oh and we'll eat the leftovers again tonight!!!!
Thursday, November 23, 2006
Creative Leftovers

Hmmmm... what to eat, what to eat...
Leftover roast chicken + leftover cranberry almond rice = the most awesome chicken salad ever!!
I cut up the leftover chicken - about 2 cups worth - and to that I added about 1 cup of the rice. I then added about a rib and a half of chopped celery, some additional dried cranberries, freshly chopped parsley and a bit of pepper. I then added about 1/2 tsp of curry powder, the juice of 1 very juicy lemon, and 2.5 tbsp mayo.
We served this up over a bed of baby greens and iceberg lettuce scoring a 10 out of 10 for the best chicken salad ever!!!
Our food pictures are terrible lately - we promise to work on that and figure out the focus and lighting!
Tuesday, November 21, 2006
Roasted Chicken
Like boiling water or sweating an onion, roasting a whole chicken is an essential - cooking 101, really. Once you've got your roasted chicken recipe down perfectly, you can always lean on it for a great meal plus leftovers...
Yes, we've done it before, but we are back and better than ever with a tinkered recipe that has been blowing socks off from here to the Charlestown Navy Yard! (granted, that's not VERY far, but you should try driving it..!)
The key update we've made to this recipe is incorporating the oft-used brining process into the run-up to the actual roasting. We modify our brining solution - to accomodate for the longer time needed to brine a whole bird - by dialing down the amount of salt and sugar and allowing the chicken to bathe for closer to 8 hours. So - 8 cups water, 1/2 cup kosher salt, and 1/4 cup brown sugar. Stir this up real good... (Actually it helps to dissolve the salt and sugar in 4 cups water and then add the other 4 cups of water - just easier to stir it well.)
To that briney water solution we added some whole corriander seeds, whole black peppercorns, dried bay leaves, 4 good shakes of Worchestershire, a few dashes of Texas Pete's hot sauce, and a drop of liquid smoke. Stir it up again and put your chicken in! We had a 6lb "roaster"... put it in breast-side down, cover it, throw it in the fridge and go relax for 6-8 hours!
Why the brine? It's easy to see in the results - VERY MOIST WHITE MEAT that could possibly pass for dark meat because of it's wonderful, moist texture. Also, the brine imparts all those lovely flavors over the course of the 8-hour soak... adding salt, pepper, hots, and all the other flavors to the chicken.
Alright, after 8 hours the oven is ready at 400-degrees. Take the chicken out and rinse thoroughly, inside and out, pat dry and then onto the roasting pan it goes. Get a 1/2 stick of butter melting and cut about 4 lemons into quarters and peel 4 cloves of garlic. Stuff the lemon and garlic into the chicken's cavity until it can't take no more, then tie off the legs with water-moistened kitchen twine to hold the lemon and garlic in.
Take a brush and cover the outside of the chicken in that melted butter - making sure to get the wings and drums. Finally, a little sprinkle of kosher salt and fresh ground black pepper over the top seals the deal. Many folks tuck the wings under to help them cook along with the rest of the chicken - but we don't! We like the wings to get nice and crispy - crispy enough to eat the tips of the bones! Yup... that's Stacey's favorite part...
Chicken goes in and turn the oven down to 350-degrees and let 'er go. A good rule of thumb that seems to work for us is 22 minutes/pound (so this 6lb bird was in for just over 2 hours) - but test the temp on the breast looking for about 160-degrees and the drums/thighs for up above 170-degrees. Our skin came out nice and crispy, but we may even start the oven HOTTER next time (like 475-degrees) before turning down to 350 upon chicken insertion.
Take yer bird out and let 'er sit for 10 minutes, then... carve and enjoy! DELICIOUS!!! Came out so tender and perfectly flavorful! We enjoyed ours with Stacey's Cranberry Almond Wild Rice - plenty of everything for leftovers, too!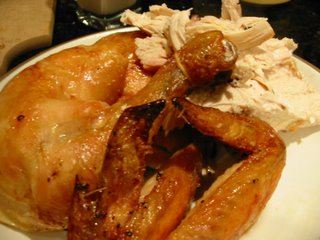
Monday, November 20, 2006
Cranberry Almond Wild Rice

Cranberries evoke that holiday good-will and yummy food excitement for me. Recently in the cafe at work they had a cold rice dish with plump juicy raisins in it, and it got me to thinking.
Why not simmer some dried cranberries in with my wild rice?? And what could make it even better? Nuts, that's right, crunchy nuts. So while the rice simmered, I toasted some slivered almonds up in a dry pan and I only added them to the rice once the rice had absorbed all the chicken broth.
This makes for an interesting sidedish with any meal! And how did it taste?? Well, M said not too many cranberries please because I only like their tartness in small doses. So I went easy on them, but I could've used more b/c once they plump up and simmer with the rice in chicken broth, their pungent flavor mellows and slightly infuses the whole dish.
Tuesday, November 14, 2006
Baba Ganoush
Poked holes with a fork in one large eggplant and set it in a baking dish and into a 400-degree oven for just over 30 minutes. That eggplant went through quite a transformation during that time - going from a vibrant, shiny purple veggie to a wrinkled, shriveled-up one... it was quite a fast aging process!
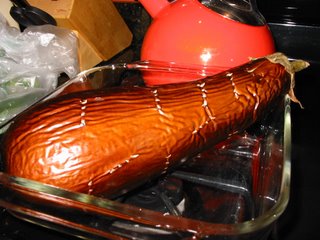
We tested the flesh of the eggplant with a fork and found it to be nice and soft, so we set it aside to cool and pulled out the old food processor, a can of tahini, lemons, extra virgin olive oil, and minced up a couple big cloves of garlic.
When the eggplant cooled, we removed and discarded the very top and bottom and then cut the eggplant lengthwise into quarters. From that configuration, it was pretty easy to just peel the skin off the flesh in a few big strips. After that, it's into the food processor...
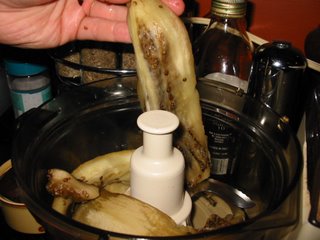
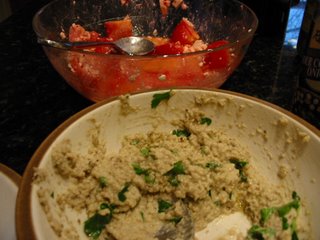
Give that a good initial spin while adding the juice of two lemons (about 4 tablespoons). Then add the minced garlic and a few big dollops of the tahini paste and a big pinch of kosher salt. More spinning and then we tried it... it didn't seem to be getting to the consistency we were looking for so we added some olive oil and spun it for a good couple of minutes - that really started to even it out. Consistency where we wanted it, we checked the flavoring and maybe added a little more lemon and olive oil. One last spin and then out of the processor and into the fridge for a good sit.
After about an hour we were ready to go. Chopped up some fresh parsley and added it at the last minute... cut up some soft pita bread and we ate the baba ganoush with the pitas and some pepperoncinis along with a tomato and feta salad! Came out great - the longer in the fridge, the better!
Monday, November 13, 2006
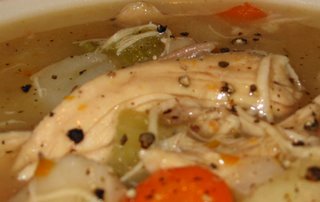
Chicken and Dumpling Stew
Chicken and Dumpling Stew
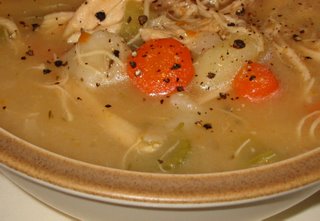
We've been wanting to make this old recipe of ours in our new kitchen for quite some time. Finally the weather, our plans, AND our mood allowed for it. This is a recipe that's been passed down from my French-Canadian Memere to my Mom, to me, and although it is somewhat simple and subtle on taste, it is one of the most comforting of the comfort foods out there. This stew is also a meal that freezes well, so if you like to make meals in bulk, this is a winner!
We boiled a whole chicken (5-7lbs) for about 45 minutes, then removed chicken to cool - saving that delicious chicken broth that the water has now become. With a ladle, it's pretty easy to trim off much of the fat that floats to the surface. Our seven-pound bird was HUGE!
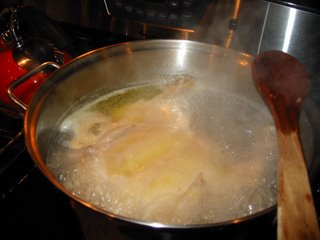
With the chicken out and cooling, we started our now-skimmed broth boiling again and added 3-5 boiling onions, a few bay leaves, 4-6 chicken bouillion cubes to bolster the flavor, and S&P, thyme and rosemary and let that go to reduce down and concentrate the flavors...

Now that the chicken has cooled, it's time to start dismantling - removing skin and bones and shredding the chicken into little chunks. Then, after pulling out about 1 cup of the broth for later use with the dumplings, we put the chunked chicken, celery and carrots back into broth and brought back up to a boil for about 15 minutes.
In the meantime, we peeled 3-5 Yukon Gold potatoes and cut them up into 1-inch cubes - the bigger the bitesize the better because you don't want them to overcook. The pototoes go in after that 15 minutes and we started in on the dumplings:
Roughly 2 cups flour, 2Tbs baking powder, 1 tbs onion powder, S&P... and slowly work in cup of reserved broth. Dumpling mix should be sticky but not overly wet. Using 2 spoons, drop the dumplings into the pot. If your dumplings puff up too much, you can always halve them while they're in the pot. They shouldn't be bigger than about 2 inches.
Your stew is done once the dumplings sink, but do cut one in half to make sure they 're cooked all the way through before serving!
Delicious and warm comfort food for a cold, rainy day in Boston!
