Showing posts with label grilled. Show all posts

Tuesday, April 22, 2008

Apple Cornbread Stuffed-and-Grilled Pork Chops

This one is a keeper... the crumbled cornbread is mixed with diced apple sautéed in butter and - while the pork chops are grilling - the juices combine with the cornbread stuffing and make such a great sweet, grilled flavor. Yum - we'd like to serve this for guests sometime soon... anyone free this weekend???

We start off by making our Cast Iron Skillet Corn Bread. Although we had to use lowfat milk instead of buttermilk and didn't go with the bacon this time, still came out sweet and corny (ha). The great thing about this recipe is that we'll only use maybe 1/4 of that skillet of cornbread - the rest is for us to enjoy!


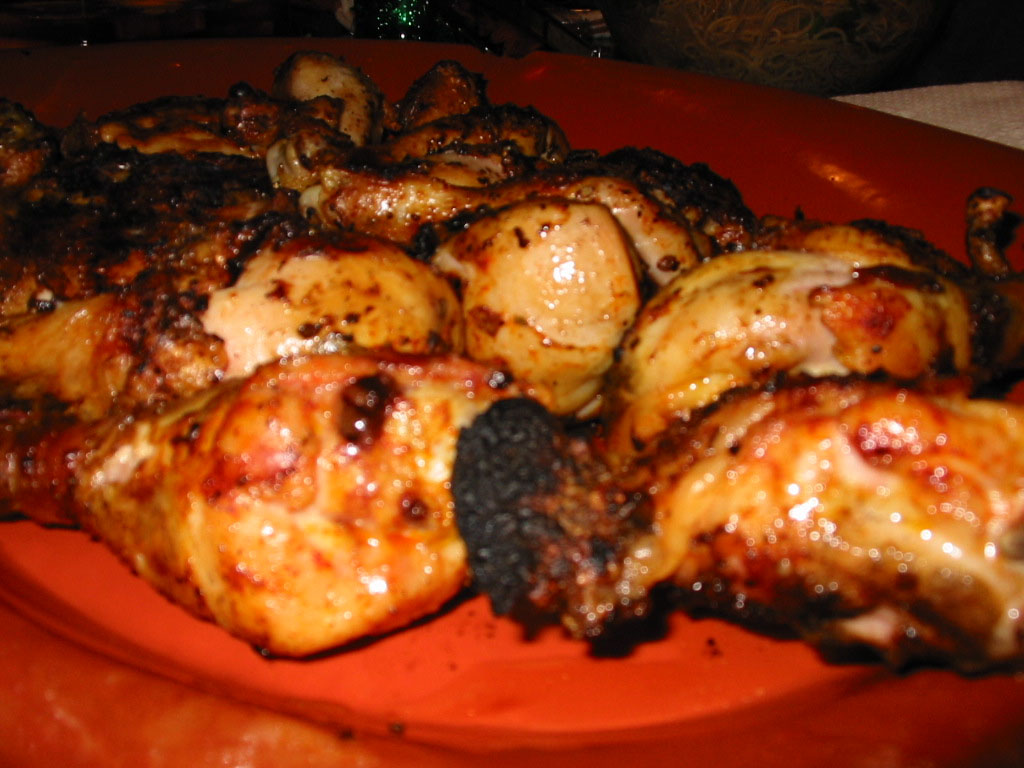
This recipe was cribbed from notes of an Alton Brown preparation of some Stuffed, Grilled Pork Chops, and you'd never believe it - but he brined them first! (He brines everything.) So, so did we - in cold water, kosher salt, about a cup of cider vinegar, maybe a 1/4-cup of brown sugar, and some Tellicherry peppercorns. Combined well, we added our bone-in pork chops - about 1" thick - and they took a swim for a couple of hours.

After the brine the pork chops will have taken on a little gray color on the very outside, just as you would see on a brisket or other cut of meat that you are brining with vinegar (unless you add nitrates to keep it pink). Don't even worry about that gray color - that just means you did it right.

So, 1" bone-in pork chops brined and cornbread cooling... the final piece of this puzzle is one diced Braeburn apple, sautéed in about a 1/3 stick of butter along with a little sprinkle of brown sugar and a pinch of salt. When cooked soft, add that apple-butter mixture to 1/4 of your cornbread that has been crumbled into a bowl - and mix together to make your stuffing.

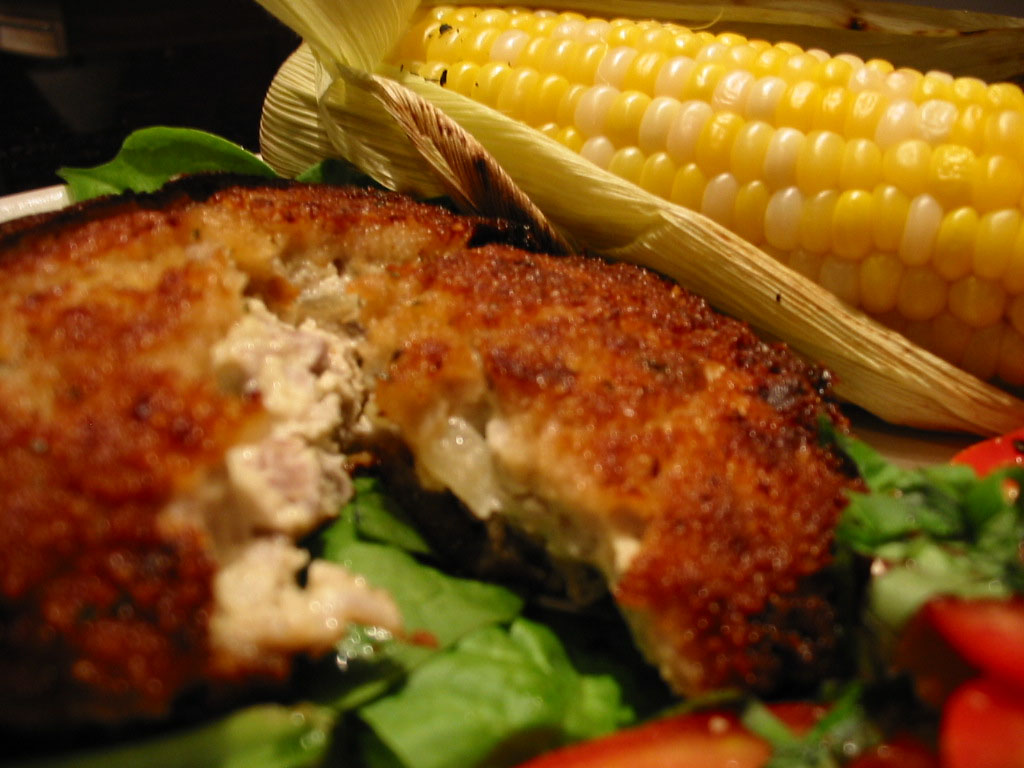
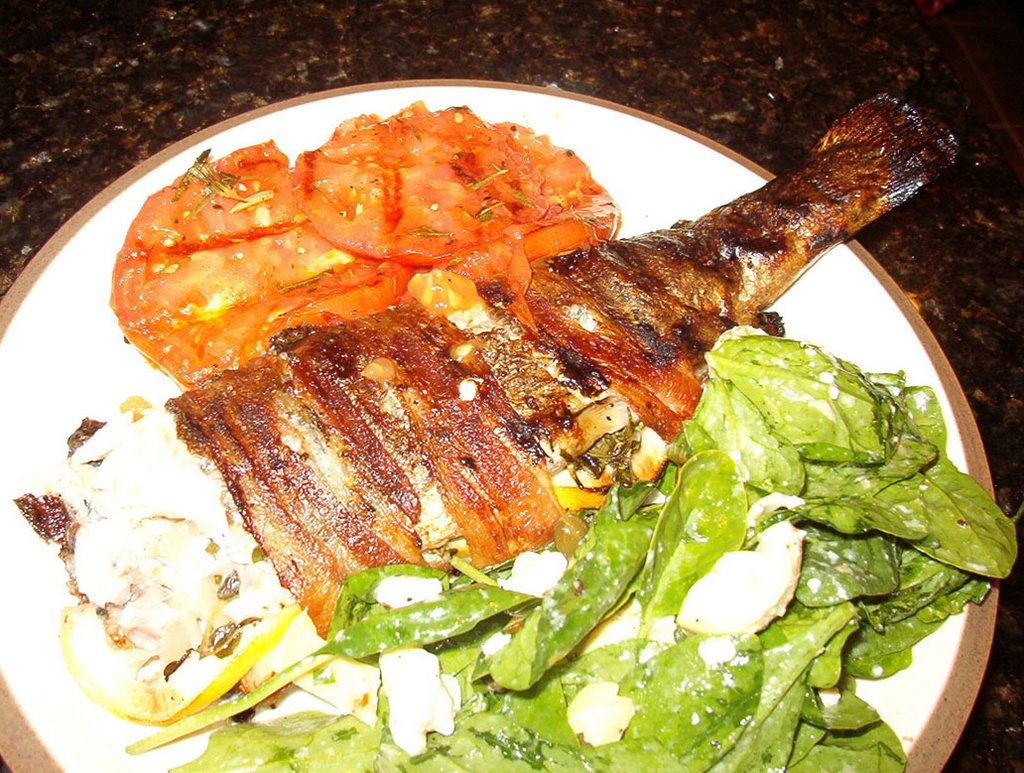
Assembly: cut an incision into the "top" meaty part of your pork chops with a sharp-tipped knife and cut through the middle of that meat to make a pocket for your stuffing. Then, stuff. As much apple cornbread mixture you can fit, and flatten it down in the chop to distribute evenly. Repeat.

A simple salt and pepper and sweet paprika sprinkle on the outside of your pork chops and onto a hot medium-high grill for 3 minutes, then "twist" (or rotate) 90-degrees to create the grill cross marks (thanks, Alton) and go 2 more minutes. Then flip, 3 minutes, rotate 90-degrees, 2 minutes, done. After a few minutes cooling time, you're ready to eat.


We had ours with some sautéed swiss chard with raisins. Remove the red ribs from the chard, dice them up and add to a large pan that already is warmed with some olive oil. Sautée for just a couple of minutes and then add a handful of raisins and 1 cup of chicken stock. Cover and simmer for 15 minutes. Remove the cover and add the greens which you have roughly chopped. Let those wilt for about 5 minutes, and some salt and pepper to taste and you have a great healthy sidedish. The sweetness of the raisins balances out the slight bitterness of the chard.


The pork chops with their cornbread and apples and paprika crust came out so wonderfully charred and sweet, so moist, and so flavorful... we were in love. Along with the swiss chard with it's sweet, plumped raisins and a little slice of cornbread, this meal is definitely a keeper. Come on over!

Wednesday, October 10, 2007

Beer Can Chicken


We wish we could share the sweet, smokey smell...

This beer can chicken is, in my opinion, the best chicken we've ever made. It is our crispy, buttery, smokey, succulent, sizzling chicken masterpiece and it literally stands on it's own. The perfect chicken.

We had tried Beer Can Chicken once before but we rushed it and hadn't done enough research. It came out kinda dry and none-too-flavorful. It was ok, certainly not great.

This time, we did it right and followed all the necessary steps, starting with brining the chicken (1 roaster chicken - ours was 6.5 lbs.) in a brine of ~2 quarts water, 1/2 cup kosher salt, a few big tbls of sugar, a bunch of ground black pepper and crushed bay leaves, a long pour of soy sauce, and many shakes of Texas Pete's hot sauce. Certainly that could have brined overnight, but we only had the day to do it - so it got a few precious hours in the bath.

An hour before we were ready to put the chicken on it's perch, we prepped some hickory chips to add that wonderful smokey flavor to the gas grill... a few big handfulls (maybe 2-3 cups) of the wood chips got a soak in a bowl-full of 1/2 beer and 1/2 water.

Additionally, we made a "rub" of sorts that would be multi-purpose... The rub consisted of pretty much equal parts: ground black pepper, kosher salt, garlic powder, onion powder, and a mix of dried oregano/basil plus a little bit of cumin. To that, we added much MORE than an equal part of smoked spanish paprika.

After an hour we drained that beer/water, added the chips to two separate small aluminum trays and placed those trays under the grill grates - on top of the burner-protectors. Then we fired up the grill, started melting a stick of butter in a saucepan on low, and took out the chicken.

After draining the brine, we thoroughly rinsed the chicken with cold water. Then, after using paper towels to dry inside the cavity, we squeezed in the juice of 1/2 a lemon and tried to swirl the juice around as best as possible. Then we scooped in a couple spoons of that pre-made rub... and dried off the exterior with paper towels, prepping it for a massage.

On a big plate, we began brushing on some of the melted butter (be sure to save at least 1/3 of it!) all over the chicken - top, bottom, back, front. Then we sprinked and rubbed in that spice mix - spreading it all over the buttered chicken as best as possible. We ended up shaking on a little extra salt/pepper/paprika on some spots that needed extra attention. Then we got out a beer can...

A 16oz Miller High Life can, to be exact! After washing the outside of the can, about 2/3 of it went into a frosty glass for the chef, leaving 1/3 of the beer in the can. I used some scissors to cut away most of the top of the can, leaving a large opening. The last of the rub (a couple big spoons), the rest of the butter, and the juice of the other 1/2 lemon were then added to the beer in the can and swirled together. This left the can about 2/3 full of liquid - you wouldn't want to go any higher than that with the liquid.

Finally, put the can on the plate, and slide that chicken right down onto it. Et voila!


By now the grill is HOT and the wood is smoking, so we reduced the heat on the two outer burners and turned the middle burner OFF - and placed that chicken right down onto the grill, supported like a tripod by the beer can and the two legs. Monitor the temperature to try to bring it down and hold at 350. Eventually, after lots of playing with it, we had it steady at 350 but you'll have to watch it at first as everything adjusts. Yer looking at about 18-20 minuts/pound of chicken - but really the important thing is ~170 for the breast and ~180 for the drums.

We left that cover on and took maybe one little peek halfway through - we wanted that smoke to be stuck in there (as much as possible on a gas grill) and we knew we'd be rewarded... from about an hour in, the smell of the smoke and the chicken cooking right on the grill and the beer/butter/lemon was wafting through the air and tempting our appetites.

Ours was ready in just under 2 hours and we carefully removed it to a platter, still standing up, with two sets of tongs for it to rest for ~15 minutes. After that, with one set of tongs holding the chicken and the other gripping the bottom of the beer can, we slid that sucker off and onto a cutting board to be carved.


It was delicious... like we said, smokey and sweet, a little lemony, crispy skin. The extra paprika had burned in the places where it was a little too thick (as you can see by the before and after pics), but no big deal. TENDER breast meat, hints of lemon and sweet smoke - possibly the best we've had. Dark meat that had that dark-red smoked appearance and the texture of butter. Crispy skin and meat falling off the bones... Wonderful! Can't wait for leftovers tonight!

Monday, September 10, 2007

Oregano Steak with Grilled Sweet Potatoes


Oregano has rocketed to the top of our favorite-herbs list... we love the tangy, slightly-spicy, and a-little-bit-bitter flavor it adds to savory dishes - both in fresh form (growing out on our deck) and in dried form. Obvious oregano uses are in sauces and on pizzas, but we decided to add a healthy amount of dried oregano to a dry rub on a big boneless top sirloin - to see how the flavor went with a grilled steak.

Along with a little olive oil and salt and pepper, we rubbed in a good deal of dried Mexican Oregano (less sweet, more spicy than Medditeranean Oregano) all over our steak, then wrapped it tightly in plastic wrap and let it hang out in the fridge for a couple of hours. The steak was then removed from the fridge to come close to room temperature, and we started the grill.

When the grill was good and REALLY hot, that steak went right in the middle and cooked for 4 minutes/side. We removed the steak to a cutting board to rest - and sprinkled some fresh oregano leaves over the top. The heat woke that fresh oregano up and - combined with the grilled oregano in the rub - it smelled fantastic.

Along with the steak we grilled some sweet potato wedges and mixed up an onion-and-chive dipping sauce to go with them: 1 cup low fat sour cream, 1/4 cup mayo, 1 tbs Penzey's Fox Point Seasoning, some white pepper, salt, and some garlic powder, and dried chives.

This sauce - and some sliced cukes - added to the Greek feel of the oregano steak, which was tangy and spicy and delicious! Now, where will we apply oregano next??

Saturday, September 08, 2007

Yellow Tomato Salsa over Grilled Chicken


Along with the tons of cucumbers my parents gave us from their northern Maine garden, they also gave us 10 smallish green tomatoes. We asked them what kind they were, but they couldn't remember the exact name other than they've planted them before -- or had they!?!?! When they started to turn yellowish, we started drooling --every day we would watch them, but they weren't turning red! What was going on?? One started getting soft too, so I gave Mom a call to find out what was up! Did they not like being in Boston? Nope, Mom said, I think your father bought yellow tomato plants by mistake! Well, that gave us the go ahead, and boy were they delish. In this dish they remind me of mango or yellow pepper b/c for us, it is rare to have a yellow tomato! This was a very simple Friday night meal, but it was full of flavor!


For the salsa, I chunked up 2 yellow tomatoes, 1 avocado and a quarter of a red onion. Some salt and pepper and the juice of 2 limes, et voila that's it! M brined some chicken breast earlier in the day, and topped them with some Penzey's Cajun Seasoning. Grilled to perfection with a side of couscous and topped off with the yellow tomato salsa, a great summer night meal!

Tuesday, August 14, 2007

Grilled Trout


Gearing up for another weekend of camping, hiking, and fishing, we thought an appeal to the Fishing Gods was in order in the form of grilled whole trout. Similar to last year's grilled trout, we bought some cleaned trout and some fresh herbs and a lemon, brought it all home, and warmed up the grill.

We rubbed a thin layer of olive oil inside the trout cavity - and on the outside of the fish - and sprinkled in and out with kosher salt and ground black pepper. Then we added thinly sliced lemon rounds and a stack each of fresh dill and chives. We wrapped our trout in a few pieces of bacon - which will add some smokey flavor and self-baste the fish throughout the grilling process... Grill hot, ready to go!


We added the fish to the grill that already contained some soaked corn on the cob (husks peeled back, silk removed, husks replaced, wrapped in string, soaked in cold water for 30 minutes, onto the grill and turned for ~25 minutes) and let those trout go for 10 minutes before flipping and cooking for 10 more minutes. Corn off, fish off, grill off, let's eat!


Delicious fish with lots of flavor from the lemon, herbs, and bacon. Comes right off the bones - just pick it off. And grilling the corn is the only way to go - we'll never boil again! Hopefully this meal will bring us luck on the lakes and rivers of New Hampshire this weekend!

Monday, August 06, 2007

Grilled Eggplant with Basil Tomato Salad


Our basil is out of control this year - which we really don’t mind, but we are always having to find new ways of using it! We were trying to come up with a twist on a Caprese Salad, and we think this did the trick...

We started out by making the salad so that it had at least 30 minutes to chill out in the fridge. Diced 2 medium tomatoes, added 1 16oz can of garbanzo beans, a couple tbsp capers, the juice of 1 lemon, some salt, white pepper, olive oil and a splash of red wine vinegar. Then, out to the deck to harvest about 12 BIG basil leaves which I chopped up and added to my salad. Into the fridge for at least 30 minutes, but the longer the better!

Now on to the base of this dish. We sliced 1 medium eggplant into half inch thick rounds and brushed those rounds with olive oil, and just put some salt on for seasoning. We grilled the eggplant over medium heat for about 5 minutes per side. At the last moment, I placed some sliced fresh mozzarella onto each eggplant round just to get it melting slightly... then off the grill.

A scoop of the tomato salad onto the eggplant and mozz finishes this super simple and yummy sidedish. Personally, I don’t eat the skin of the eggplant, but I keep it on while grilling to hold it together. It’s easy to remove after you have it on your plate - the eggplant "meat" comes right out!

Now we're trying to find ideas for the next basil recipe!

Tuesday, July 24, 2007

Summer Chicken and Basil Soup


“Soup?!?! But it’s 75 degrees outside!” M says. I said trust me, this will be a nice light brothy soup with a lilt of herbal delight. We had grilled up several split chicken breasts the other night and had plenty of tender white meat leftover. Chilling out in the crisper were 3 little zucchinis that would also star in the show.

Half a thinly sliced onion went into the pan to sautee with some olive oil for a few minutes. I quartered the zucchini, chopped up about 10 baby carrots and then threw them all in for a quick sautee with the onion. After that went in 2 cloves of minced garlic, and shortly thereafter 5-6 cups of chicken stock. After that came up to a slow boil, I added in my chopped up chicken from the other day along with some black pepper.

After letting that get happy for 20 minutes, I took out about ¾ cup of the zucchini with some stock and pureed that in my blender. CAUTION! When putting hot stuff in a blender, take care to hold down the lid as it expands and splatters! Pour blend back into the pot. I really wish I would have pureed twice that amount to give the soup more of a potage feel, but that will be for next time!

After another 5 minutes, I added about 15 basil leaves that I had chopped up, let that simmer for another 5 minutes, et voila, a light chicken soup avec zucchini et basil!


Tuesday, July 03, 2007

Grilled Pork Chops and Roasted Asparagus


This plate of meat dedicated to Martin!

We made a marinade (not a brine) for these bone-in shoulder blade pork chops consisting of: olive oil, white wine, soy sauce, hoisin sauce, garlic powder, onion powder, dried thyme, dried oregano, smoked paprika, kosher salt, and cracked black pepper. Into the freezer bag and squished around to evenly distribute that delicious sauce, then the pork chops spent a relaxing day in the fridge getting to know their new flavor.

When we were ready to go, we preheated the grill to medium-high AND the oven to 425. We chopped a bunch of asparagus (asparagi?) into 2-inch long pieces, added them to a baking dish, and combined them with the juice of an orange, soy sauce, chopped scallions, garlic powder, salt, and some crushed red pepper. Those asparagi would take a total of 15 minutes roasting time...


These pork chops were maybe 3/4" thick, so we pre-set a time of 6 minutes on the first side, 5 on the other. Chops on, 1/4 spin after 3 minutes, flipped after another 3, and back off after 5. Sit and rest, done and done.

And they came out wonderfully... a very flavorful marinade that - for once - didn't impart "too much!" of anything (salt, pepper, hot sauce are the usual culprits). Very tender - perfectly cooked. And that meat right on the bone??? Yum!

Tangy, still-slightly-crunchy asparagus and some whole wheat mac-and-cheese made for great accompaniment. Plus.... leftovers!

HAPPY FOURTH OF JULY!

Wednesday, June 13, 2007

Twin Grilled Whole Chickens


Exactly like the title says - twin whole chickens, roasted on the grill. Why not? We try to avoid running the oven for long periods of time during the summer, so we're grilling everything. This time, we wanted to make something that would stretch a few nights (and would be inexpensive, as well) so we spotted these twin-packs of ~4.5lb chickens on sale for $.99/pound! SOLD!

We determined right away that we'd try roasting them whole on the grill at the same time, using the outer burners to maintain the 350-degree temp and leaving the middle burner - over which the chickens would sit - turned off. Like most grills, ours has a thermometer that we'd be monitoring closely and adjusting those burners accordingly. Other than that, we'd treat it just like any other roasted chicken.

So.... we brined them overnight in a solution of water, salt, sugar, bay leaves, spices, hot sauce, and soy sauce. About an hour before they were to meet the grill, we took them out and rinsed them down and threw them back in the fridge. Shortly after, we went out to preheat the grill and grabbed a bunch of fresh herbs from the back deck - basil, tarragon, rosemary, lavender, and oregano are all growing happily out there.


Finally ready to go, we melted some butter and pulled the chickens out. Salt and pepper the inside and stuffed a big handful of herbs in each, then tied the legs together. Brushed on some melted butter on the outside and added the final spices - salt and pepper and smoked paprika - to the outer skin.

Grill at about 400, we popped the two chickens on (can't believe we didn't take pics of them on the grill! next time..) and shut that grill up. We could hear the skin popping and crackling as soon as they hit the hot grates! The temperature immediatly dropped to about 360, so we let that go. At about 4.5 lbs each, we'd be looking at 1.5 hours but we'd start checking the temp at 1 hour.

An hour later we opened the cover for the first time and they were happily cooking away! Took the temp and it seemed that we'd be on schedule for that 1.5 hours... sure enough, a half-hour later, all temp readings came back "ready" and the twins came off to sit under some foil for a resting period.

The chicken came out wonderfully... perfectly cooked, not uneven at all, some grilled flavor but not overly smokey, just juicy and flavorful! To accompany our twin birds (we only ate part of one, and have lots leftover!) we made a ratatouille with eggplant, tomatoes, onions, green pepper, tossed with some olive oil, dried thyme and basil, salt and pepper - and roasted that in a 400-degree oven for ~45 minutes. Delicious!

Thursday, June 07, 2007

Grilled Salmon with Spinach Alfredo Pasta


What do you get when you mix 2 cups of cooked spinach with 1 cup of alfredo, lots of garlic and a handful of whole wheat pasta? A super bed of yummy goodness on which to rest a nice piece of grilled salmon of course!

We simply marinated a couple of salmon filets in white wine, chopped chives, and some salt for about 30 minutes, and then grilled them to perfection on a hot grill for 4 minutes on each side. To plate, make a thick pool of your creamed spinach mixture, top with a bit of whole wheat angel hair pasta, and set the cooked salmon on top. Super easy dish to make (especially for a crowd!!)

We’re off to go fishing again this weekend, but this time up in New Hampshire. Hopefully we’ll catch something to put on our table!

Sunday, April 08, 2007

Mixed Grill Mole Enchiladas with Cucumber Salsa


We craved authentic Mexican food - the kind we'd get at La Paloma in Quincy or Salsa's in Southie... smooth textures, a little spiciness, cheesiness, and a hint of chocolate lingering in the background, mole-style. We thought we'd try a new one (for us) to satisfy this craving and make Baked Enchiladas.

We had to construct this one from the outside in - so here's what we knew: we wanted the filling to be comprised solely of beans and meat, we wanted some fresh green salsa-type topping to offset the meat and beans, we wanted to make our own enchilada sauce, and we wanted that sauce to be mole-style - with a little chocolate flavor mixed in with just a hint of spicy chipotle.

That left us with questions - firstly, what kind of meat? We knew we'd be making dinner with leftovers in mind (as usual) so we came to the conclusion - we got the room, why not TWO kinds of meat? Why not, indeed. So we picked up an inexpensive steak (top round, about 1lb) and a package of boneless/skinless chicken thighs that were on sale (also about a lb).

Second question - beans. We wanted to make our own refried beans because we know what texture and flavor we like in our beans. Refried beans aren't actually RE-fried - they are only "fried" once. So, what kind of beans? Ummmm.... how 'bout RED!

What kind of fresh salsa? Cuke-and-corn. How do you make enchilada sauce? With a roux, raw tomato sauce, and mucho gusto. What to drink with this enormous meal? Margaritas, of course! Plus we can use some tequila in our mixed grill marinade.

So we did just that - we allowed the chicken thighs and the steak to marinate in separate freezer bags consisting of some healthy splashes of tequila, some good-old American lager (these were some drunk meats), olive oil, cumin, chili powder, and salt. They stewed in their liquor for an hour or so before they were ready to meet the grill.

At the same time, we prepared our Cuke-and-Corn salsa in advance so it would be given time to settle in the fridge: into a bowl went an English cucumber partially peeled and chopped into quarters, two vine-ripe tomatoes cut into chunks, one 8oz can of corn (drained), the juice of 2 limes, 1 tbps olive oil, 2 tbsp chopped cilantro and a few pinches of salt. The salsa needed some heat, so we took out a jar of sliced jalapenos and added four minced little rings. After adding a couple of splashes of cider vinegar, it was ready to go in the fridge for a couple of hours.


Back to the meat - since we'll be shredding these and cooking them again in the oven, cooking times seemed less important - so all the meat went on a hot grill and got flipped and smoked and grilled for a while, we lost track of how long. When they appeared ready (and were tasting deliciously tangy and spicy), they came out for a rest - later to be chopped up into little pieces - and we soldiered on...

We were ready to start the final two componants - the sauce and the beans. We started a roux in one pan with a couple tbls of canola oil with a couple tbls of flour. When that was a nice tan, we added a bunch of chili powder and slowly mixed in one 8oz can of tomato sauce, then about a cup-and-a-half of water. That got to a great consistancy right away, so we added some cumin and a little salt and let that come up to a simmer.


In the other pan, we started sauteing some garlic and onion, and then we added two cans of drained red beans. Then Stacey got out her masher and went to work. After the mashing was complete, we added some liquid that we mixed from some of that enchilada sauce combined with water. When that liquid combined with the mashed beans achieved the texture we were looking for, we added some of those same old Mexican spices until the beans were the exact flavor we were looking for.


The final touch on the sauce - some semi-sweet chocolate chips (only about a dozen or so of them, a little goes a long way) and a few shakes of ground chipotle to LIVEN things up.

Oven to 400-degrees, we were ready to assemble. First, we spread a little enchilada sauce across the bottom of a glass baking dish. Then, wheat tortilla in hand, we spread some beans on the bottom and topped with the now-shredded meat, rolled the tortilla up, and placed seam-side down in the baking dish. Repeat for a total of four times with chicken and four times with steak.


(we need a new camera)

Over that? All that mole enchilada sauce... poured over it and spread out so everything gets moist. And over that? What do you think - cheese! A good amount of shredded "Mexican" cheese.

Into the oven for ~25 minutes, the cheese on the top browned up nicely (we actually finished it by firing up the broiler for 5 minutes) and the bubbly concoction came out. We plated one steak and one chicken for each of us and topped with some healthy scoops the cool cuke salsa (cool? spicy!)...

Absolutely delicious - such a great texture and the tortilla edges had crisped up a little... just a hint of chocolate (you can smell it more than taste it) and a touch of spicy chipotle, all cooled down with the cuke and cilantro. Wonderfully authentic-tasting - and with two kinds of meat! We enjoyed these with a margarita and the Red Sox night game and thought about warmer summer temperatures to come.

Monday, September 04, 2006

August & the End of Summer

As you can probably tell, we are once again ramping up our food blog posts now that summer is coming to an end. Although we've been cooking plenty all summer long, the hot, late days are not exactly conducive to writing about cooking. We are on our fourth tank of propane for the Weber on the deck for this summer, and we no plans to stop firing up that grill this fall. We'll have lots more pics and posts come football season (go Pats!) and autumn - probably our favorite time of year. A preview of grilled drumsticks from a recent cook-out we had with friends at our house:


After a rainy start to the summer, August was beautiful in New England and we took advantage by spending time outdoors, playing tennis, cooking out, and CAMPING. We went for two long weekends of camping in August, once just the two of us and another time with three other couples - friends of Michael's from high school. Both times we went to New Hampshire - it is easy for us to get up there and they have a wonderful state parks system.

First we camped at Pawtuckaway State Park, just east of Manchester New Hampshire. Pawtuckaway was very nice, the sites were secluded and the terrain was varied, making the sites even more interesting and different from one another. Many of the sites are on an island called Horse Island and most of the sites on that island border right up to the lake. The only problems with Pawtuckaway is that they allow motorcraft on the lake! We could hear motorboats cruising around well into the very late night and during the day there are jetskis cruising around. Not exactly relaxing to be on a canoe with jetskis flying past... Also, the beach area was way overcrowded when we checked it out - people were packed in, it looked like a refugee camp! Luckily, the beach was far away from the camp areas and the campsites are for campers only - so it was much quieter. Here is a map of the camp sites:


Here is the view from Site 19... right on the water:


This area was beautiful and we went on a great hike and cooked some good food - pre-marinated steak tips, pasta salad, sandwiches, even bacon-and-eggs for breakfast. When camping, we bring a carton of egg beaters along for a variety of reasons - no broken eggs, no mixing eggs in a bowl, etc. We start the grill up - we have a little propane grill that we use for breakfast and other quick cooking and a charcoal setup that we use for dinner when we're winding down at the end of the day - and get a pan going on the grill with the bacon. On the other side of the grill, we start grilling up our wheat toast. When the bacon is done, we wipe out the pan and then start with a pat of butter. Melt that and in go the egg beaters and a little salt and pepper. Stirring, we add some american cheese at the end. Voila - bacon and cheesy scrambled eggs with toast - perfect camping breakfast.

Pawtuckaway was a preview of our next camping trip to Bear Brook State Park with our friends. We had a great setup at Bear Brook - a much more remote campsite right on two ponds - Beaver Pond and Spruce Pond. The sites are ok, they are somewhat packed together which is surprising given the 10,000 acres (and 40 miles of hiking trails) in this amazing park. The ponds are beautiful and we got some great canoing and fishing in!


We caught mostly perch and some big sunfish - Stacey caught two big perch (8"+) that we ended up bringing back to the campsite in our 5-gallon bucket and scraficing to the camping gods (quickly cutting off their heads). We then gutted and filleted them as best as possible and immediately sauteed up the results in butter, salt and pepper. They were very good! As they say, perch are the tastiest fish in the lake.

Additionally, we had some great steak tips (a camping staple!), bbq chicken, honey chicken, lots of burgers and hot dogs, a few pounds of bacon, lots of sandwiches and cereal and snacks and many, many beers! We ate very well for being "desolate" in the woods...

Michael getting the charcoal going:


Here is the whole group at our communal site, left to right in the back: Jimmy, Brian, Scott, Mike. The girls: Kylene, Sarah, Traci, and Stacey. And in the front, the very well behaved camping mascot/dog, Roxy.


We had a great time throughout August and while we are sad to see it go, we will hold on to our great memories. Autumn is in the air and we are excited to get back to cooking in our kitchen, trying new things on the grill, and taking lots of pics for posts...

Hope you had a great summer too and see you soon.

~Boston Chef

Monday, July 31, 2006

Bluefish "Burgers", Grilled Corn on the Cob, and a Tomato Basil Salad

We've been eating alot of fish and shellfish lately - trout, steamers, haddock, and now bluefish! Inspired by our favorite food blog, Helen's Beyond Salmon, and her recipe for "the other burger", we decided to make our own bluefish burgers! Morse Fish Company had some very fresh bluefish for $6.99/lb so we picked up a pound and brought it home. Along with that, we got some fresh corn on the cob and a couple of big, red tomatoes.

Back at home, M pulled the bluefish off of its skin in little chunks until he had shredded the whole thing. Then we mixed in some mayo (maybe 1/4 cup), dijon mustard (couple dollops) and some onions we had previously sauteed and allowed to cool (a medium onion, diced tiny, cooked with a generous pinch of salt). We would have thrown in some cilantro, but alas, we had none...

This made for VERY loose consistancy - not like patties at all, it would go right through your fingers. Undaunted, we scooped up 1/2 the mixture and plopped it onto a sheet in a relatively patty-shaped fashion... then repeated with the other 1/2. This sheet went into the fridge for a couple of hours and it was during this time that it solidified enough to work with.

The corn on the grill we have down pat by now: Peel back - but don't remove - the outer husk and remove the silks. Then fold the husk back up over the corn and use kitchen string to secure. Submerge in a bowl of water for 30 minutes so the husks get wet and the corn plumps up a little and they are ready to go. Hot grill, but careful over direct heat (the husks will burn a little, no problem) for 25 minutes, turning frequently. A little butter and salt and you have perfect corn on the cob!

Back to the bluefish... The only disappointing thing about this recipe was that they were to be pan-fried and not grilled. But we wanted to cook outside! Not to worry, we simply took our little le creuset baking dish and placed it right on the grill - using it as a griddle!

We pulled out the now-somewhat-more-solidified bluefish patties and sprinkled the top side with breadcrumbs. Carefully flipping over, we finished lightly breading the other side and forming these into actual patties - they were perfect consitency by this point.. to our relief!

We put the baking dish-cum-griddle over a medium high heat, carefully added some olive oil, then dropped our bluefish in... cooking them for about 5 minutes per side.

We served them up on a bed of baby spinach with the grilled corn, and a tomato, EVOO and basil salad. Not really burgers - more like patties. They were ABSOLUTELY DELICIOUS!!! Wonderful flavor and texture - we'll definitely be refining this recipe a little and making these again! Thanks, Helen!


Sorry about the pictures, we are trying to use a new old camera and may just have to go digi camera shopping...

Monday, July 17, 2006

Grilled Pizza

What CAN'T you grill? Maybe pancakes and eggs - but you just need a griddle to make that work!

We did our normal pizza crust, but this time we left it as dry as we could possibly stand. Perhaps over-moistening had been our downfall in the past, the pizza dough sticks to everything and it is hard to get it nice and thin. This time, we added the yeast-and-water mixture and stirred it for a long time. What felt like it would be way to dry finally absorbed all the water evenly and the dough came out great. 3.5 cups whole wheat flour (with some salt and garlic powder for seasoning), 1 cup warm water that had yeast and a little honey added to it. That's IT! It looks like it wants more water... it is BEGGING for more water! DO NOT GIVE IT MORE WATER! Then, into an oiled bowl for at least an hour. This crust was the beginning of a great pizza.

We rolled out our dough into two pizzas to fit more easily on the grill. Grill preheated to a blazing 600-degrees, I wiped on a little olive oil on the grates and then popped the dough right on the grill! It bubbled up at first but those bubbles were taken care of after being flipped over - after about 3 minutes.


After about three more minutes on side #2, these were brought back inside for their dressing. We had sauted green peppers and onions and mushrooms, plus we had some deli ham and turkey pepperoni. Let's put it all on there! First sauce, then layer of cheese, then sauteed veggies, then meat, then cheese!


We put this full-dressed pizza on our pizza stone and put it back on the grill until the cheese was nice and melty and JUST getting a burnt top. We used the stone to heat the pizza at this point so that the crust didn't end up a charred mess... the stone worked perfectly! After the one, we popped the other pizza in, popped a beer, turned on the game, and sat down to enjoy our grilled 'za. Pizza, beer, Red Sox game - all the makings of a great summer evening!

Wednesday, July 05, 2006

Grilled Whole Trout


Please also see our 2008 Trout Post!

We like to go camping in New Hampshire later in the summer - set up the tent, blow up the air mattress (a necessity!), start the fire, and - surprise! - cook outside all weekend. When we go, we rent a canoe and go fishing for trout and perch... it's so peaceful to be out on the lake in the late afternoon's setting sun, just floating and pulling in a few fish.

On the shore of White Lake, New Hampshire:


Stacey throwing in from the shore - doesn't work too well in glacial lakes, but made for a nice picture!!


Here's a nice-sized perch that Stacey pulled in:


While we wait to go again in August and September, we've begun to crave those lake fish. They had a few fresh-looking trout, dressed, at Stop and Shop so we thought we'd give the whole fish a shot on our new grill.

The victims:


When I was a kid, my brother and father and I would catch trout while camping and memories of bacon-wrapped trout on the grill resound in my mind. I couldn't resist including bacon with the trout! So we rinsed and patted-dry the trout, then massaged a light layer of olive oil inside and out. We salt-and-peppered the inside, then placed garlic, lemon slices, and a big bunch of rosemary and thyme (fresh from the back deck) in the cavity. We then wrapped bacon slices around the fish and - holding the fish closed - toothpicked the bacon on to hold everything together.


These guys went on a very hot grill - covered and maintained at about 425-degrees - for 10 minutes per side.


The bacon fat acted as a self-baster and although it caused a few flare-ups, they were quick and harmless. The end result:


Delicious! Trout isn't exactly the MOST flavorful fish (edit: it's pretty darn delicious), but with the lemon and herbs and bacon, we coaxed the most out of it... doneness was perfect, the flesh slid right off those little, translucent bones. With the trout, we had a spinach salad with feta cheese, olives, and capers. We also threw some thick tomato slices on the grill for a few minutes.


Can't wait to go camping later this summer and get REAL fresh fish! If anyone knows of good camping and fishing spots in New Hampshire/Maine, let us know!!!