Showing posts with label pork. Show all posts

Friday, February 24, 2012

Pork Lo Mein


So what to do with all that super tender pork butt you made the other night?  This time around I decided to go in an Asian direction.  With no Chinese restaurants in my town, I often get that craving for some MSG (oops! I mean umami).  Pork Lo mein to the rescue!  This is a great recipe to use with chicken, beef or tofu as well.  So get your woks out and let's begin!

Friday, February 17, 2012

Boneless Pork Butt


Pork Butt, also called Boston Butt, is actually a somewhat tough (but full of fat and connective tissue) cut of meat from the upper shoulder area.  It is the perfect braising cut!  In the past, I've used the picnic, or the lower shoulder, but that usually comes with bone and skin (which is a pain to remove.)  So having a ready to go, boneless cut of meat makes this a low maintenance dish which involves 3 steps: dry rub marinade, searing and braising.

Tuesday, April 22, 2008

Apple Cornbread Stuffed-and-Grilled Pork Chops

This one is a keeper... the crumbled cornbread is mixed with diced apple sautéed in butter and - while the pork chops are grilling - the juices combine with the cornbread stuffing and make such a great sweet, grilled flavor. Yum - we'd like to serve this for guests sometime soon... anyone free this weekend???

We start off by making our Cast Iron Skillet Corn Bread. Although we had to use lowfat milk instead of buttermilk and didn't go with the bacon this time, still came out sweet and corny (ha). The great thing about this recipe is that we'll only use maybe 1/4 of that skillet of cornbread - the rest is for us to enjoy!


This recipe was cribbed from notes of an Alton Brown preparation of some Stuffed, Grilled Pork Chops, and you'd never believe it - but he brined them first! (He brines everything.) So, so did we - in cold water, kosher salt, about a cup of cider vinegar, maybe a 1/4-cup of brown sugar, and some Tellicherry peppercorns. Combined well, we added our bone-in pork chops - about 1" thick - and they took a swim for a couple of hours.

After the brine the pork chops will have taken on a little gray color on the very outside, just as you would see on a brisket or other cut of meat that you are brining with vinegar (unless you add nitrates to keep it pink). Don't even worry about that gray color - that just means you did it right.

So, 1" bone-in pork chops brined and cornbread cooling... the final piece of this puzzle is one diced Braeburn apple, sautéed in about a 1/3 stick of butter along with a little sprinkle of brown sugar and a pinch of salt. When cooked soft, add that apple-butter mixture to 1/4 of your cornbread that has been crumbled into a bowl - and mix together to make your stuffing.

Assembly: cut an incision into the "top" meaty part of your pork chops with a sharp-tipped knife and cut through the middle of that meat to make a pocket for your stuffing. Then, stuff. As much apple cornbread mixture you can fit, and flatten it down in the chop to distribute evenly. Repeat.

A simple salt and pepper and sweet paprika sprinkle on the outside of your pork chops and onto a hot medium-high grill for 3 minutes, then "twist" (or rotate) 90-degrees to create the grill cross marks (thanks, Alton) and go 2 more minutes. Then flip, 3 minutes, rotate 90-degrees, 2 minutes, done. After a few minutes cooling time, you're ready to eat.


We had ours with some sautéed swiss chard with raisins. Remove the red ribs from the chard, dice them up and add to a large pan that already is warmed with some olive oil. Sautée for just a couple of minutes and then add a handful of raisins and 1 cup of chicken stock. Cover and simmer for 15 minutes. Remove the cover and add the greens which you have roughly chopped. Let those wilt for about 5 minutes, and some salt and pepper to taste and you have a great healthy sidedish. The sweetness of the raisins balances out the slight bitterness of the chard.


The pork chops with their cornbread and apples and paprika crust came out so wonderfully charred and sweet, so moist, and so flavorful... we were in love. Along with the swiss chard with it's sweet, plumped raisins and a little slice of cornbread, this meal is definitely a keeper. Come on over!

Tuesday, April 15, 2008

Pig Trotters


As we've learned from some of our favorite Food television personalities - Anthony Bourdain, Mario Batali, Andrew Zimmern - and the worldwide Michelin Star chefs that they visit with on their shows, some of the best and most-flavorful cuts of meat are often the ones generally left unused. The offal, the cheeks, the tails, the gizzards, the marrow, the entrails, the feet - these life-long, 80-hour-a-week chefs swear by them and seek them out. Despite the "Boston Chef" name, we are not chefs. But we do like to learn from chefs and experiment with that knowledge.

So, pigs feet. $.99/lb at the grocery store, split in half and pointing at us - beckoning us to give them a shot.


This occasion is one of many in which we buy something at the store with no idea of how to cook it, then we furiously scan the internet for ideas and recipes when we get home. We decided we'd do an amalgamation of a few recipes we ended up finding, chiefly from these wonderful new blogs we've discovered: Slurp & Burp and In Praise of Sardines.

So we first blanched our trotters for 5 minutes in boiling water as a preliminary cleaning, then added them back to the rinsed pot along with an onion and a few stalks of celery cut into 1" chunks, a few peeled cloves of garlic, a big bay leaf, a handful of peppercorns and a few whole dried cloves - and covered all of that with cold water.


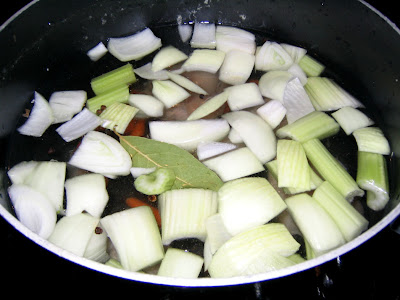
We brought that back to a boil, covered tightly, and let them go for 3.5 hours. Although the recipes we referenced noted we'd have to skim the fat during that simmer time, we never had much fat boil up to the top - so we just let those trotters go! After that time, we removed the now falling-apart pig's feet and let them cool until they could be handled.


Then we picked them apart. The skin was peeled off and set aside, and everything else - the meat, the tendons, the cartilage, the gelatine - was removed from the bones and placed in a bowl. Everything that wasn't bone was going back in to be eaten.

After the bones had been cleaned of meat, we cut up part of the skin and added that back to the meat mixture - maybe 1/8 of the final product consisted of the skin. Then we chopped all of that mixture together into a sort of ground meat consistency and put it in a bowl. To that, we added the chopped green ends of a baby vidalia onion (the "onion" part of which was being used elsewhere), kosher salt and ground black pepper, and about a tablespoon of dijon mustard.


After mixed together, we packed our concoction into two oven-safe ramekins...


...topped them with a thin layer of breadcrumbs, and placed the ramekins in a larger pan for handling's sake.


And we put them into a 450-degree oven. After about 10 minutes, the pork mixture was bubbling up and the bread crumbs were beginning to cook. We wanted that topping toasted and crunchy, so we fired up the broiler and moved the ramekins right up under the blue-hot flame and watched closely. Another couple of minutes and they were done.


To counteract the meaty dish, we prepared a briny "salsa" of capers, a diced pickle (it's LIKE a cornichon!), some leftover onion greens, a dab of anchovy paste and a dab of dijon, some olive oil and some red wine vinegar. Then, we topped a bed of baby arugula with the salsa and - after the trotter dish had cooled just a little - ate it.

The pigs feet were very good - much as noted over at In Praise of Sardines, the resulting meat is unctuous. It has a gelatine consistency that alone would not stand up but - when combined with a little crunchy breadcrumb crust, a crisp arugula leaf and the briny salsa - has a deep mellow pork flavor that was wonderful. Getting that balanced fork-full of pork, crust, arugula, and salsa resulted in a perfect bite - and there were those few bits of very dark meat/marrow that were the real prizes in the hot little ramekins.

Would we do it again? Maybe, maybe not - it was alot of work. But what we WILL do is look for Pig's Trotters - and cheeks, and offal, and marrow, and tails - when we're out at our favorite restaurants!

Thursday, February 21, 2008

Perfect Pork Chop


Boneless pork chops are just so tempting when you're browsing the meat department at the local mega-grocery store, trying to think of something to make. They are the perfect serving-size, they look easy to cook (sans bones), they are healthy (pretty much), and they hint at being tasty (they ARE pork, after all).

But then you grill them, or pan-saute them, or bake them (shake-and-bake or otherwise) and you end up with DRY, flavorless pork. Your cuts of meat have turned into warm styrofoam and you - at least WE! - are disappointed with our choice, once again.

But wait! What is the method that we see in open kitchens in restaurants we visit and on the chef's stations of cooking shows we watch? Browning, then moving to the oven to finish. This method of cooking SEEMS daunting - at least to US! - because you are sending your quick-cook cut of meat off to the dark regions of the oven. We normally reserve oven introductions for long, slow visits... covered, with liquid or not. But, there's a reason you see this method in professional kitchens - and that reason is juicy, flavorful meat!

Not only that - once you get past the initial fear of sending your boneless pork chop off to the oven - it's easy, too! This may all seem elementary to some, but it took us a while to figure everything out. Here's what we do:

Take 4 boneless pork chops, maybe 3/4" inch thick, and season both sides with salt, pepper, and something else... we keep going with this oregano/basil/thyme/fennel mixed seasoning we have, but you could try smoked paprika, garlic-and-onion, maybe crushed red pepper - whatever you fancy. Also, get the oven preheated to 350.

Then heat a little olive oil - maybe 2 tablespoons - in a pan on pretty high (preferrably a non-non-stick pan... so, a stick pan. but definitely an oven-safe pan) and start browning your pork chops. After about 3 minutes on side #1, turn and brown side #2 for 1 minute and then turn off the heat and pop that pan into the oven. Since it's uncovered, it helps if you have a wire splatter screen to put over the top or you'll get some mess in your oven.


8 to 10 to mayyybe 15 minutes later (depending on the thickness of your pork chops) you're done! Pop them out, make a little incision if you want to make sure there is barely any pink left (this isn't poultry, but get to the doneness you want), and then let them sit for a minute or two.

If you want to go one final step - remove those pork chops to a plate to sit and put the pan back on high heat on the stovetop, then splash some wine into the pan - white or red, whatever you're having. Stir and let that cook for two minutes and you've got a great little pan sauce.

Voila! Juicy, flavorful boneless pork chops in less than 1/2 an hour! A quick side of rice, or couscous, steamed asparagus, or even just a piece of bread and some heated frozen veggies... pour some of that pan sauce on your pork chops and dinner is served - in less than 1/2 hour!

Friday, September 21, 2007

Smothered Pork Chops


Thank you, Summer! We've had a great one - we camped, went to the beach on Cape Cod, played tennis, canoed and fished, took long weekends and trips, got tan, grilled alot, and generally enjoyed Summer. But, as of this Sunday, you bid us adieu and we welcome in your long-lost cousin, Autumn.

Perhaps our favorite time of the year here in New England, we love all things Autumn... the weather turns cool and crisp (no more humidity!), the maple and oak leaves turn brilliant colors and the leaves eventually fall (and we get to rake them), we visit the pumpkin farm and pick out some nice ones to carve into jack-o-lanterns for Halloween (and we get to watch cheesy horror movies!), we get to enjoy the last days before the harsh New England winter rolls in and shutters us up until April, and we get to make comfort food!

And what could be more "comfort food" than gravy-smothered pork chops? This idea popped into our heads and - after a little research, this easy recipe was new for us - we were ready to get comfortable... Along with some leftover yellow tomatoes and some long grain/wild rice, this was a very easy meal to make on a cool, late-summer night.

We helped some frozen ~3/4" thick, bone-in pork chops dethaw by adding them to a brine (after sitting in the fridge overnight) of water, salt, sugar, bay leaves, worchestershire, and hot sauce and letting them hang out for most of the day. When ready, we took these out and rinsed and dried them thoroughly, then added them one-at-a-time to a big freezerbag that was full of all-purpose flour seasoned with salt, pepper, and garlic powder.

When all were rinsed, dried, and seasoned/floured we got our big enamled-cast-iron pan nice and hot and added a good amount of olive oil to the bottom of the pan, then browned each of the pork chops for maybe 3 minutes per side. We took those out and added a little more oil to the pan, and then added a tablespoon or so of all-purpose flour (a little goes a long way) and stirred the flour into the oil until we had something like a roux. Then, we stirred in about a cup of chicken broth and scraped up all the burnt bits from the bottom with a wooden spoon, just like we're told to do! Finally, we added some chopped (from a can!) buttom mushrooms for an additional touch.


Not the prettiest picture...

We gave that gravy about 5 minutes of simmer time before adding the pork chops back in and letting them go for 4-5 more minutes. We chopped up some tomatoes and plated our rice, then a nice, big pork chop, and then smothered everything in that delicious gravy... came out great - the perfect comfort food to kick off Autumn!

Tuesday, July 03, 2007

Grilled Pork Chops and Roasted Asparagus


This plate of meat dedicated to Martin!

We made a marinade (not a brine) for these bone-in shoulder blade pork chops consisting of: olive oil, white wine, soy sauce, hoisin sauce, garlic powder, onion powder, dried thyme, dried oregano, smoked paprika, kosher salt, and cracked black pepper. Into the freezer bag and squished around to evenly distribute that delicious sauce, then the pork chops spent a relaxing day in the fridge getting to know their new flavor.

When we were ready to go, we preheated the grill to medium-high AND the oven to 425. We chopped a bunch of asparagus (asparagi?) into 2-inch long pieces, added them to a baking dish, and combined them with the juice of an orange, soy sauce, chopped scallions, garlic powder, salt, and some crushed red pepper. Those asparagi would take a total of 15 minutes roasting time...


These pork chops were maybe 3/4" thick, so we pre-set a time of 6 minutes on the first side, 5 on the other. Chops on, 1/4 spin after 3 minutes, flipped after another 3, and back off after 5. Sit and rest, done and done.

And they came out wonderfully... a very flavorful marinade that - for once - didn't impart "too much!" of anything (salt, pepper, hot sauce are the usual culprits). Very tender - perfectly cooked. And that meat right on the bone??? Yum!

Tangy, still-slightly-crunchy asparagus and some whole wheat mac-and-cheese made for great accompaniment. Plus.... leftovers!

HAPPY FOURTH OF JULY!

Wednesday, March 07, 2007

The Good Shepherd


Another casserole-type dish?!? Two in a row - you ask? You bet. And you’ll see why in a sec! It’s been cold here in Boston – demonically so, and therefore we wanted comfort food that'll keep your insides warm. We decided on a kicked up version of shepherd's pie that would be topped off by mashed sweet potatoes and sharp cheddar cheese.

We browned up some “meatloaf mix” in some olive oil. This is just ground veal, pork and beef to give a nice depth to our pie. Once browned, we removed from the pan and started sautéing diced carrots and onions. After 10 minutes we added a couple cloves of chopped garlic and some chopped mushrooms. The spicing for this dish consisted of salt, thyme and lots of freshly ground Tellicherry black pepper.


At this point we boiled up 2 diced sweet potatoes, and once tender, we mashed them with S&P, 1.5 TBS Promise, and ¼ cup milk. Returning to the veggies: we deglazed with ¼ cup red wine and 2 cups of beef stock. We returned the browned meat to the pan and added a cup each of frozen peas and chopped spinach.


After most of the liquid had cooked off, we turned off the heat and spread the mashed sweet potatoes over the top of the veggies and meat, topped that with a sharp cheddar and threw the cast iron pan under the broiler for about 5 minutes.

This pie was so delicious, it made great leftovers for days! As you can tell, we LOVE one pot dishes – so if anyone has some fantastic one pot suggestions, let us know!

Tuesday, February 13, 2007

Pork & Black Bean Tacos


We made a wonderful braised pork shoulder this past weekend, and we knew this 7lb monster (well, maybe 6lbs after all the skin and fat were trimmed) would create a foundation for many weeknight meals to come!

This is such an easy weeknight meal that involves little preparation, and that’s what I like after commuting an hour on the subway to get home after a long day. I started by bringing 3-4 cups of veggie stock to a boil and adding some Mexican oregano, cumin, chili powder, salt and some ground chipotle to it. I then shredded up maybe just-under a pound of leftover pork and threw that in to simmer with the broth and spices for at least 20 minutes, longer if you want!


When you feel like you’re ready to eat in about 10 minutes, start a sautee pan over medium heat with a couple tbs olive oil, and add half of a smallish onion that has been chopped, along with some green chiles if you want some heat. Let those cook for about 5 minutes and then add a can of rinsed black beans to the pan. Season with some salt and then after a couple minutes, coarsely mash the beans right in the pan, and let that warm through.


We served our tacos up on some multigrain soft tortillas with some lettuce, tomato, sour cream and salsa. These tacos came out great on the plate, as well as all over the front of my shirt, but oh well!

Tuesday, September 05, 2006

Braised Pork Picnic (half) Shoulder


We had always seen those huge, 14lb. Pork Picnic Shoulders at various supermarkets and marvelled over their sheer size. However, operating as a two-person team (most of the time) has always steered us towards the pork butts and smaller cuts. Sure, we probably could have asked the butcher to cut one for us, but... we didn't.

Then we discoverd the half picnic shoulder - a wonderful invention of bone-in pork shoulder, but only half the size! And at only ~$1/pound, we were dancing (as a certain Brit would say). We deposited a 6lb half shoulder in our shopping cart - along with some carrots, onion, celery, and garlic - and headed home. After paying for it all, of course.

But what to DO with our picnic shoulder? Roast it? Would come out dry, for sure. Grill it? A good option (sear, then move to one side and keep the other side on low), but again we were afraid of the meat drying out. What is the obvious choice for a cheap cut of meat that ideally could cook slowly for a couple hours and not get dried out? To braise, naturallement!

To braise means to sear and then simmer for a long period of time, either on the stove top or in the oven. The searing was accomplished after removing some of the fat and a large hunk of skin that made up one side of the shoulder, giving the shoulder a light canola oil rub and then a cover of kosher salt and cracked pepper. Additionally, we made several slits in the meat and inserted sliced garlic into the slits... this paid off big time! Introduce shoulder to hot canola oil in a hot enameled cast iron dutch oven and sear for a minute or two per side. Then, out she comes, a wipe down of the pan with paper towels (using tongs) and in with some fresh canola oil and then onions (1 medium), chopped up celery (this is for flavor, not necessarily consumption), and a couple leftover slivers of garlic.

When those ingredients have sweated out, we are ready for our braising liquid. After looking up recipes when we arrived home (shouldn't we do this BEFORE going to the store?) we realized that a popular braising liquid for this pork was unfiltered apple cider. We had none, so we had to improvise. Another recipe had the pork marinate overnight in Coca-Cola. We didn't have the "overnight" part, but we did have the Coca-Cola. Also, when we had made braised shortribs in the past, we included some vinegar in the braising liquid which imparted some nice, tangy flavor. And, we always deglaze the pan with a little red wine. We had some pork bouillion cubes in the cabinet that could fill our the volume with some hot water, too. Finally, Mike likes beer.

So we assembled our braising liquid - a splash of red wine, half a beer (Corona, a summer leftover!), a few glasses worth of Coca-Cola, generous pours of red wine vinegar, and the double pork bouillion cube broken up with about 2 cups of hot water added... smelled interesting and the beer dominated, but we knew that beer smell would mellow over the next hours and everything would meld together.

Settle the pork back in the pan and transferred to our pre-heated 325-degree oven. After an hour, we turned the meat over and had an amazing aroma throughout our house and the meat was already beginning to pull off the bone! After another hour we went to turn the meat back over and checked the temperature at this time... luckily. Temp came back at 180-degrees and the pork was ready to come out! Onto a platter and covered with aluminum it went, but not before a couple of strips were peeled off and eaten - so tender!!!


We then decided to put the leftover braising liquid to good use by boiling some veggies in it while at the same time reducing it. We put the pot back on the stove top and brought it to a boil. Chunk-cut carrots and celery went in for about 10 minutes before we threw in cubed sweet potatoes. Another 15 minutes and everything was done... plus the liquid had reduced by a 1/3 or so.


We cut up the pork based on what looked right - huge chunks - and served it up with the veggies and a little spoon of reduced liquid over the top and a little dijon on the side.

It came out perfectly - very tender and a natural pork flavor. Maybe next time we'll add the dijon right to the braising liquid, but the cooking time/temp couldn't have been better!

Cheers!

Monday, June 19, 2006

What we've eaten...

Wow, it's been a while. What can we say - we've been busy. Busy with our new house, busy with weddings, busy with the summer. But also, busy with the new grill and other warm-weather-type cooking! We'll be better, we promise. Until then, here are just a few photos to catch us up...

BBQ-seasoned Pork "country style ribs" with Grilled Zucchini and Mashed Cauliflower... these are those fake, boneless pork "ribs" that you see in the store - I believe they are really just a pork loin cut up in a funny way. Regardless, the way it is cut is perfect for grilling:


Cajun Grilled Chicken Tenderloins with Fiddleheads and Spaghetti Squash - love spaghetti squash with parmesan cheese, and the fiddleheads are still in season! Finally ran out of our sampler of Penzey's Cajun Seasoning... need more!


Beer Can Chicken! - hahaha, it came out ok. We put some melted butter and fresh thyme in with the beer and cooked this thing on the grill. Flavor was nothing special - we are so used to brining our chicken at this point that I guess we are spoiled to any chicken that isn't! There is no other way to permeate chicken meat other than brining in some way, a fact of which we are thoroughly convinced. Because there is no fat to melt and carry flavor, you have to get flavor in there yourself. Next time, we'll brine the bird overnight first! Looked good, though!!!
yes, there's a beer can up in there...

Steak Tips, Collossal Freshwater Shrimp, Artichokes, Red Bell Pepper - All Grilled, of course! - I screwed up the artichokes, but we'll give that another shot. The easiest, best, tastiest grilled thing in the world: 1lb steak tips, in a freezer bag with a store-bought steak seasoning mix, a couple dashes of worchestershire, a dash of liquid smoke, a splash of olive oil, and a little gulp of beer. Roll up the bag TIGHTLY and let it sit for as long as you can stand. Grill for 8-12 total minutes - depending on the size of the tip strips - turning a few times. Cannot go wrong!


We go to the grocery store now and just look around, trying to think of anything that can go on the grill. Leave us some fun/exotic/interesting grill-item suggestions in the comments and we'll make them and post pics! Thanks and we'll be back again soon...

Monday, May 29, 2006

RIBS!!!

We had our Memorial Day BBQ Party (see next entry) but we cooked so much I had to split it into two blog entries! One for all the rest of the food and one for the...

RIBS!!!! Our first attempt ever! The night before, we made a barbeque rub - Kansas City-style - with 1/2 cup brown sugar, 1/4 cup paprika, 1 tbls chili powder, salt, black pepper, garlic powder, onion powder - and a few shakes of cayenne pepper. We rubbed that rub all over our four sections of RIBS - two racks cut in two - and then wrapped each individual 1/2 rack very tightly in plastic wrap. The ribs slept peacefully - unsuspectingly - in the fridge overnight...

RUB IT IN:


The plan for the Ribs on the day of the party was: 1. out of the fridge for 30 minutes, 2. transfered to triple-layered alumninum foil, 3. moistened with 1/4 of a beer poured into the one, last open end, 4. and sealed off tight. Then, the packages met a very low, covered grill (about 325 was the lowest I could get it) for 2.5 hours to simmer and steam in the rub and beer.

After all that time, take them off and let them rest for about 15 minutes. Then, out of the foil packs and back onto the grill for about 8 minutes/side, basting with bbq sauce (store bought - KC Masterpiece) that entire time. Just watch them closely and finish 'em like you want 'em.

SIMMER AND STEAM:


The result? Two of the four packs (the two bigger ends of each of the two racks) came out PERFECT - and the other two were RUINED!!!!! The smaller ones were charred to an unsaveable crisp, while the two bigger ones were perfectly tender and fell right off the bone.

This is just out of the foil, BEFORE I put them back on the grill to finish them with the bbq sauce:


So, it was 50% of a whopping success! These two 1/2 racks came out so delicious - SOOOOO TENDER! - with very subtle flavor from such a seemingly POWERFUL (sweet and spicy) rub... And the SMELLS from the grill all day while it was cooking out back - sweet and delicious!

Next time I will kill the 2nd burner too and just run the one (out of three) on the lowest possible setting. I KNOW we can get these to be competition-level! It is my mission this summer...

Friday, March 31, 2006

Pork Chops with Purple Mustard Pan Sauce

We seasoned some thin, bone-in pork chops with salt, pepper, thyme, and a little dried mustard and wrapped them individually and very tightly in plastic wrap and let them sit around the refrigerator for a couple of hours before they were to meet the site of their impending doom - my sauté pan.

Heat pan, throw in a little olive oil, and in they go... these were thin and cooked pretty quickly, about 4 minutes on each side. Once removed, it's Purple Mustard Pan Sauce time! Deglaze with red wine (the purple part) and scrape up the seasoned bits that easily come off the enamel in the pan. Then add a couple tbls of dijon mustard and a little butter and stir to combine. Let it cook down a little bit and you're ready to pour it on yer chops. Easy and delicious!

What to have with the pork chops? Edamame! Why not? One of us is a HUGE fan (her) and the other is not quite as fond of the little soy bean pods (him), but she puts up with him alot, so he owes her... And it IS fun popping the little beans out of their pod... We had a frozen pack (that had been previously parboiled) so we just boiled them in very salty water for 6 minutes and then seasoned them with salt and pepper and some other stuff. They were pretty good!

As usual, we made roasted sweet potatoes to go with our pork, which we've described a few times now (cut them up, season and oil them, 400-degree oven for ~30 minutes, eat). Having this easy recipe in your repertoire comes in very handy and is a good alternative starch to potatoes/rice/pasta - again, check out some nutritional info on good carbs here...

Yum!

Saturday, February 04, 2006

Pork Fried Rice and Sautéed Broccoli

When we last joined you from Orange Kitchen (our version of Kitchen Stadium), we had successfully implemented our new wok's capabilities to construct a wonderful Shrimp Stir Fry. Knowing we like to stretch some of the work we do to a second meal, we made plenty of extra (brown) rice for our stir fry and made sure to pick up some pre-marinated Chinese BBQ Pork from the S&S butcher. Earlier in the day, we roasted those pork strips at 300 degrees for about 45 minutes, then covered them and transferred them to the fridge. The stage is set... for Pork Fried Rice!

This was an easy one, no doubt - but with deliciously complex results and wonderful leftovers for a quick bite the next day. We've all had Pork Fried Rice from the local paper-box delivery, so use that imagery to select the sizes of your cuts of: onion, celery, and the roasted pork. We had no waterchestnuts :( so we used a can of baby corn that's been sitting in the back of the pantry for a while - cut those little guys up as well, get the leftover rice out of the fridge, and we're ready to go!


WAIT! Not ready yet! "Too much rice and meat! Not enough greens," she cried! So we defrosted some large cuts of broccoli and decided to sauté those up as a side dish to our PFR (Pork Fried Rice). Throw the same Asian "rub" in with some Can-oil in the wok and toss the broccoli around for about 6 minutes (high heat!) and set those guys aside...


Ok, NOW we're ready for the PFR - onions into the hot wok with Can-oil for a minute, then the celery for a minute, then the corn, then the pork bits... add some seasoning as needed - toss and cook!


When we're ready (we're ready!) scoop about two or three cups of that cooked rice in and fold it in there. At the same time, get the all-important sauce ready - 2 eggs slightly beaten and stir in a few tbls of soy sauce and some red pepper flake.

When we're ready (we're READY already!) pour that sauce over and quickly fold in to the whole mixture. You'll see the egg quickly cooking and really pulling everything together. One more minute and when we're ready (not going to say it again!!!) plate a big ol' scoop of that with the broccoli... we're now finally ready to eat!


We popped in a movie and sat on the floor with our PFR and a glass of pinot noir and enjoyed!

Score: 9 out of 10! So tasty, not like delivery PFR - different and more just-cooked tasting (obviously).

Til next time,

The Boston Chef

Monday, January 30, 2006

Braised Short Ribs and Mashed Cauliflower

Braised again??? Who do we think we are, Just Braise?

We swore last week that we'd eschew the braise for the roast - but alas the recipe for Braised Oxtail and Baked Eggs had us salivating... When it came down to it, however, we needed a dinner, not a brunch, and we decided to finally do what we've been pining to do for a long, long time - Braised Short Ribs. (We'll do the Oxtail recipe sometime soon.)

How easy is this braised short ribs recipe? On a scale of 1-10, this is a 4 on the easy scale. The hard part is starting early enough to let that tough meat cook to sweet, tender, buttery, fall-off-bone goodness. Give yourself a total of 3-4 hours from start to finish... The Faux Mashed Potatoes (Mashed Cauliflower) will only take up the last 1/2 hour of that time.

MEATS - 3lb Short Ribs - our butcher buddy at S&S cut these up right off a big hunk of meat in the back with that wonderful band saw. About $3.50/lb, could be cheaper - but still not bad.

We crusted this with a steak seasoning mixture - sea salt, garlic, onion, fennel, and black and red pepper - and pushed the seasoning well into the meat. Heated our dutch oven over medium high and added Can-Oil (that's canola) and seared the individual short ribs on four sides in two batches.

After searing all four sides for a couple minutes each, we removed them short ribs and set aside... then added celery, carrot, and onion to the pan and let those veggies brown. After a few minutes, added minced garlic, 1 cup vinegar*, 1/2 cup red wine (cabernet), 14oz can of diced tomatoes, several liberal dashes of Worchester, black pepper, and a big ol' bay leaf... stirred that all together as it starts to warm (scraping up the browned bits with that wooden spoon from the bottom of the pan that are left from the seared short ribs) and then finally we added the meat back in, settling them on the bottom with tongs. We ended up adding about two cups of beef broth, just until the ribs were covered with liquid.

Bring close to boil, reduce heat, cover, simmer 2.5 hours. Easy peasy, lemon squeezy!


We don't eat lots of baking/white potatoes when we can use alternatives (Boston Chef #1 diet, Boston Chef #2 plays along...) so we do a mock one with frozen cauliflower (fresh sometimes, but that fresh cauli can be expensive) boiled and then drained. Add light cream cheese and seasoning and mash it up, just like potatoes. These are an excellent substitute for mashed po's!

Scores:
* Braised Short Ribs - 7 out of 10 - the texture was PERFECT, so tender, "falling off bone" is overused but true in this case - only 1/2 of the ribs actually hung onto the bone! The meat just stripped apart with the slightest touch - this would be perfect to add homemade bbq to the leftovers and make sandies. * Too much vinegar, however - next time 1/2 cup or less. The vinegar DID give it a great flavor, but the cupful was overpowering... The veggies came out great, too. Not mushy (because they were simmered, not boiled) and with lots of the beef and seasoning flavor.
* Mashed Cauli - 8 out of 10 - SUCH a great substitute for high-carb mashed potatoes... with a little of that beef juice spooned over the top, it is such a great side.

Also, Boston Chef #1 dragged Boston Chef #2 to the MALL where #2 was forced to buy new jeans... but it was worth it because we went into Williams and Sonoma with some $$$ left over on a gift card. We bought a great new 9" wok (we needed a wok!) that was on sale for $50 down from $110. So we'll be stir frying very soon and looking around for great recipes - got any? Post in comments!!! Thanks!

Leftovers tonight!!!