We keep a two-pound bag of frozen easy-peel shrimp on hand at all times - just in case! - so thursday evening we pulled a couple of handfulls out and let them defrost in the refrigerator overnight. We knew that on friday evening we'd employ the trusty grill pan and whip up some easy, delicious SHRIMP FAJITAS - YEA!!!!!!!
Peel the shrimp (these are already de-turded and broken open on the back, so it is easy) and then we de-vein them too. I guess you don't need to do remove the vein but - let's go the extra mile, shall we? With a tiny-bladed knife, it's easy to slice down and pull that thing out and just wipe onto a paper towel. Alright, yeah, it isn't fun, but it's worth it.
We don't have an outdoor grill yet, having just moved to a house with a porch a few months ago from a completely "landlocked" apartment in the city, so we use our Calphalon grill pan, which is the next best thing. (If you just have a regular sauté pan, hey - you get a great fajita that way, too...) Slice up a big green pepper and throw into a plastic bowl (with a cover) with a fajita-seasoning combo of cumin, chili powder, salt, red pepper and a little olive oil to get the seasoning spread all over the pepper slices. Put the top on and shake shake shake and then right onto the hot grill pan (medium-high heat).
As one of us tosses those peppers, the other slices an onion and into the bowl it goes for it's seasoning and shaking... after a few minutes head start, push the peppers to one half of the pan and add the seasoned onions to the other half. Toss and cook both sides and get those peeled shrimp into the bowl as the last contestant on Season and Shake!
The shrimp won't take but a couple minutes on the grill pan, so get your accoutrements ready - throw whole wheat tortillas on a plate covered with wrap into the microwave for 45 seconds. We like a little shredded mexican cheese, some sour cream and some salsa over the top. Get all that out and when you're about ready, add the shrimp to the grill. Let those cook on one side for 2-3 minutes, flip and do it again and you're ready. Just scoop a layer of peppers and onions onto a tortilla wrap, then 4 or 5 shrimp (ours are LARGE), then a little cheese, a dollop of sour cream and some salsa, roll it up like a cigar and enjoy hot!
Crack a beer and turn on the basketball tourney and away we go!
Til next time...
~El Cocinero de Boston
Tagged with: IMBB24 + 30Minutes

Saturday, March 25, 2006

Sunday, March 19, 2006
Irish Lamb Stew

Happy St. Patrick's Day!!!
We love St. Patrick's Day! One of the Boston Chef duo is primarily Irish-American (and the other is adopted Irish-American) and growing up, St. Patrick's Day was always celebrated with great Irish gusto by our 100% Irish mother. Now, we live in Boston - a very Irish-American city - and specifically Dorchester down by Adams Village, which is one of the most Irish sections of a very Irish city! When we go down to the pub, many of the patrons aren't Irish-American - they're IRISH, straight from the Emerald Isle. Did you know America's first St. Patrick's Day celebration was held right here in Boston back in 1737? We love everything about the season - the cheerful celebrating, the traditions, the clothing, the Guinness (and the Jameson!)... and, of course, the food!
Corned beef and cabbage is the Irish-American staple of the holiday and we had some deliciously prepared by the pub mentioned earlier on Friday - boiled corned beef, turnip, a big potato, carrots, and a huge wedge of cabbage. It was the perfect start to the weekend. However, corned beef and cabbage is a specific Irish-AMERICAN invention, not a tradition in the country of Ireland. For that, we turn to a more traditional Irish recipe to help celebrate our wonderful weekend - Irish Lamb Stew.
We procured three pounds of lamb shoulder from the butcher, still on the bone, and played the butcher at home by separating the meat from the bone. The meat from the shoulder went into a big bowl to be lightly tossed with just a couple tbls of flour seasoned with ground black pepper and kosher salt. The bones (with lots of meat still clinging to the sides) go into a bag and into the refrigerator to be used to make a delicious stock the next day - boiled with veggies and spices. Plus, you get to gnaw the last of that meat off the boiled bones! Yum!!!
Meat lightly coated, we started with chopped up bacon in our dutch oven. Once that's rendered, remove the bacon and start browning the lamb in the bacon fat - we did this in two batches. Once browned, remove and throw in a diced medium onion for a minute, then a couple of diced garlic cloves. Once those are ready, deglaze the pan with red wine and scrape up the bits from the botton with your wooden spoon. Then, we're ready to simmer - lamb back in, bacon in, and add about 3-4 cups of stock (we used a mixture of beef and pork stock), some black pepper and a little bit of salt, and a big bay leaf. Combine all of this and bring to a gentle boil, then reduce heat to a very low simmer, cover, sit down and pour yourself a pint - I had a perfect "half and half" made with Guinness and Harp.. not a "black and tan" which is made with Bass!)
Half and Half
We're looking for a total of two hours of simmer time to get a wonderfully tender and flavorful result from the lamb, so work backwards adding the following:
* Chopped carrots and celery - 1 hour left (since we're simmering, not boiling, these will be perfectly done - not mushy)
* Chopped onion - 45 minutes left
* Cubed sweet potato - 30 minutes left (yes, we use sweet potato instead of traditional, our one concession to "diet" here!)
Once that time is up, ladel the chunky stew into a bowl and enjoy! 
Erin go bragh!
P.S. - Here it is Sunday and we're watching Jack Hart's South Boston St. Patrick's Day Parade Breakfast and making our stock with the reserved lamb bones from yesterday. (Truthfully, I just want to gnaw on the bones after they're boiled!)
Finally, we wanted to take part in the Weekend Cat Blogging that we've watched for the past few weekends.. we have two terrors of our own!
Here, Osiris is supposed to be guarding our pears - but he seems to have fallen asleep on the job!

Tuesday, March 07, 2006
Brined and Broiled Chicken Legs with Sautéed Broccoli Rabe and Roasted Sweet Potatoes
It is freezing in Boston - it's been freezing for a few weeks now - and grilling outdoors is an option that we won't begin exercising until next month. (Looking forward to GRILL SHOPPING! leave your suggestions in comments!) So, we choose to do the next-best thing when craving the flavor of grilled chicken but stuck inside on a cold New England evening - use the broiler!
In order to infuse our chicken legs (1 pkg bone-in thighs [about 4 big ones] and 1 pkg wings [about 6]) with the most flavor, we like to brine them when we are going to broil them over (under!) the open flame of the broiler... Yes, we learned it by watching you, Alton.
Because we are using chicken pieces, brining is a much less time-consuming endeavor. Only 2 hours in the cool brine is enough - indeed, more than that is too much - to really infuse the flavors that are in the brine into our chicken. A whole, uncut chicken needs much longer to brine effectively. You see, the salt content of the water is higher than that of the salt content of the water in the chicken, so (the laws of chemistry state that) the higher salinity water wants to move into and take up residence in areas where the salinity is of lower concentration - like in the chicken. And, whatever other flavors that have been included in that high-salinity water will go along for the ride. Or something like that...
We bring 4 cups of water close to a boil and mix them with 3/4cup kosher salt and 1/2cup granulated sugar - stirring that mixture until the sugar and salt are dissolved. We add that water to a big glass bowl and add another 4 cups of cold water to fill out the full amount of H20 needed. The original 4 cups of hot water is to make sure the sugar and salt get completely dissolved - not easy in cold water.
This time we decided to add to this basic brine some dried crushed bay leaves, dried thyme, and a handful of fennel seeds. We also threw in a tbls or two of soy sauce and just a wee dash of liquid smoke - for that smokey grilly flavor! Have to let that luke-warm solution cool, so cover with plastic and let it sit in the freezer until about 2 hours before you are ready to being the "grilling" of your chicken. When you reach T-minus 2 hours, lay the chicken pieces in the brine and weigh down with a plate so all the chicken is submerged, re-cover with plastic and set in fridge.
When we're ready to go, put the oven broiler on high and let the oven heat. Take out the chicken, rinse each piece well and pat dry with a paper towel. Next, we seasoned with salt, pepper, garlic and onion powder and paprika on both sides, then placed the chicken on a broiler pan and brushed the top/skin with melted butter.
The pan with the chicken can go on the top rack right up under the broiler and the potatoes (we used our standard sweet potato recipe - peeled and cubed, drizzled with olive oil, and dusted with salt, pepper, and garlic powder) can go on the bottom rack to start cooking. Just monitor the chicken starts to brown and when you've reached a nice browned/charry skin surface, switch the oven to bake mode (we had it at 385 degrees) and let the chicken and potatoes finish by roasting.
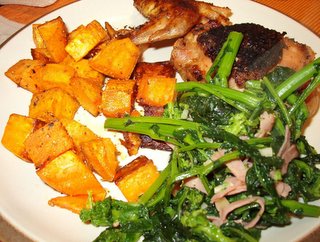
We par-boiled the broccoli rabe to try to eliminate some of the inherent bitterness - about three minutes, and then drained very well. Then, with about 5 minutes to go on the chicken and potatoes, we sautéed the broccoli rabe in olive oil, garlic, and some sliced deli ham (because we didn't have bacon or sausage or pancetta - all better options!)...
Served all of this up with a little beer for one of us, glass of cabernet for the other. Let us give scores for this one, shall we?
* Chicken: 7 out of 10 - the brining worked great, there was flavor infused throughout the meat of the chicken that tasted of the fennel and thyme and smoke. However! All that brining was close to enough seasoning, we ended up putting too much on the outside, as well, and kind of over-seasoning. The butter ended up burning the skin. Buttering the skin of chicken works great when roasting (indirect heat) but not for broiling - you get charred skin! Very tender and flavorful meat underneath the over-seasoned/burned surface, however.
* Broccoli Rabe: 8 out of 10 - very tasty green veggie alternative. Bacon woulda really added the extra flavor that was needed. Very little bitterness...
* Potatoes: 8 out of 10 - very good, as usual, nice balance with the sweet of the potatoes and the broccoli rabe's more bitter, earthy texture. Cooked two minutes too long this time.
In order to infuse our chicken legs (1 pkg bone-in thighs [about 4 big ones] and 1 pkg wings [about 6]) with the most flavor, we like to brine them when we are going to broil them over (under!) the open flame of the broiler... Yes, we learned it by watching you, Alton.
Because we are using chicken pieces, brining is a much less time-consuming endeavor. Only 2 hours in the cool brine is enough - indeed, more than that is too much - to really infuse the flavors that are in the brine into our chicken. A whole, uncut chicken needs much longer to brine effectively. You see, the salt content of the water is higher than that of the salt content of the water in the chicken, so (the laws of chemistry state that) the higher salinity water wants to move into and take up residence in areas where the salinity is of lower concentration - like in the chicken. And, whatever other flavors that have been included in that high-salinity water will go along for the ride. Or something like that...
We bring 4 cups of water close to a boil and mix them with 3/4cup kosher salt and 1/2cup granulated sugar - stirring that mixture until the sugar and salt are dissolved. We add that water to a big glass bowl and add another 4 cups of cold water to fill out the full amount of H20 needed. The original 4 cups of hot water is to make sure the sugar and salt get completely dissolved - not easy in cold water.
This time we decided to add to this basic brine some dried crushed bay leaves, dried thyme, and a handful of fennel seeds. We also threw in a tbls or two of soy sauce and just a wee dash of liquid smoke - for that smokey grilly flavor! Have to let that luke-warm solution cool, so cover with plastic and let it sit in the freezer until about 2 hours before you are ready to being the "grilling" of your chicken. When you reach T-minus 2 hours, lay the chicken pieces in the brine and weigh down with a plate so all the chicken is submerged, re-cover with plastic and set in fridge.
When we're ready to go, put the oven broiler on high and let the oven heat. Take out the chicken, rinse each piece well and pat dry with a paper towel. Next, we seasoned with salt, pepper, garlic and onion powder and paprika on both sides, then placed the chicken on a broiler pan and brushed the top/skin with melted butter.
The pan with the chicken can go on the top rack right up under the broiler and the potatoes (we used our standard sweet potato recipe - peeled and cubed, drizzled with olive oil, and dusted with salt, pepper, and garlic powder) can go on the bottom rack to start cooking. Just monitor the chicken starts to brown and when you've reached a nice browned/charry skin surface, switch the oven to bake mode (we had it at 385 degrees) and let the chicken and potatoes finish by roasting.
We par-boiled the broccoli rabe to try to eliminate some of the inherent bitterness - about three minutes, and then drained very well. Then, with about 5 minutes to go on the chicken and potatoes, we sautéed the broccoli rabe in olive oil, garlic, and some sliced deli ham (because we didn't have bacon or sausage or pancetta - all better options!)...
Served all of this up with a little beer for one of us, glass of cabernet for the other. Let us give scores for this one, shall we?
* Chicken: 7 out of 10 - the brining worked great, there was flavor infused throughout the meat of the chicken that tasted of the fennel and thyme and smoke. However! All that brining was close to enough seasoning, we ended up putting too much on the outside, as well, and kind of over-seasoning. The butter ended up burning the skin. Buttering the skin of chicken works great when roasting (indirect heat) but not for broiling - you get charred skin! Very tender and flavorful meat underneath the over-seasoned/burned surface, however.
* Broccoli Rabe: 8 out of 10 - very tasty green veggie alternative. Bacon woulda really added the extra flavor that was needed. Very little bitterness...
* Potatoes: 8 out of 10 - very good, as usual, nice balance with the sweet of the potatoes and the broccoli rabe's more bitter, earthy texture. Cooked two minutes too long this time.

Wednesday, March 01, 2006
Sausage & Rotini Stuffed Acorn Squash
What is better than a meal served in a vegetable? Eating the bowl your dinner comes in is a wonderful treat. This recipe also gives us an opportunity to take our fabulous meat sauce in a totally different direction. We’ve made this several times, initially taking a cue from a recipe by Emeril on foodtv.com... "Baked Acorn Squash Filled with Italian Sausage and Rigatoni Pasta"
Start your basic sausage meat sauce. When you’re all set to put the sauce on simmer, cut 2 acorn squash in half, seed them and place flesh side up in a glass baking dish. Cover the bottom with water and cover the dish with foil. Bake at 375°F for ~ 45’ until just tender. In the meantime, cook up your favorite wheat pasta cutting your portion in half since this is not the main focus of the dish.
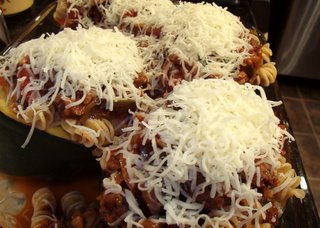
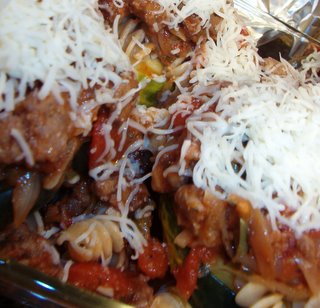
Remove squash from oven and drain the water out of the dish. Season the squash with S&P and place about a ½ cup cooked pasta in each squash half and mound with your sausage sauce overflowing the sauce a bit. Top with some shredded mozzarella and return to the hot oven for 15-20’ until cheese has melted and browned a bit. Half a squash is plenty for one serving, so can you say delicious leftovers?!!?!?!? We can!!!
Start your basic sausage meat sauce. When you’re all set to put the sauce on simmer, cut 2 acorn squash in half, seed them and place flesh side up in a glass baking dish. Cover the bottom with water and cover the dish with foil. Bake at 375°F for ~ 45’ until just tender. In the meantime, cook up your favorite wheat pasta cutting your portion in half since this is not the main focus of the dish.
Remove squash from oven and drain the water out of the dish. Season the squash with S&P and place about a ½ cup cooked pasta in each squash half and mound with your sausage sauce overflowing the sauce a bit. Top with some shredded mozzarella and return to the hot oven for 15-20’ until cheese has melted and browned a bit. Half a squash is plenty for one serving, so can you say delicious leftovers?!!?!?!? We can!!!


Subscribe to:
Posts (Atom)